- John's Pro-Photo Tips -

Fill Flash
How to give your photos brilliance
What is Fill Flash?
Fill Flash is the art of softening or brightening harsh shadows in exterior portraits. Typically on sunny days. Although the technique can also be helpful on dull rainy days. I trained in England where we get a lot of days like that. My former boss, during my rookie days as a trainee – called his flash unit his “portable sunshine”.
So how does it work? Let’s take three scenarios where fill flash can help:
- Sunny days that create harsh shadows
- Sunny days when you want to back-light the subject
- Cloudy days when the light is dull and flat.
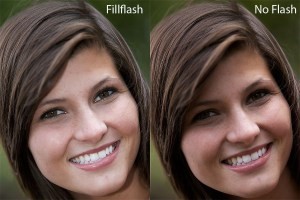
In these two shots, we see the difference between the subject photographed with available light only (No Flash) and with on-camera flash (Fill flash). The flash has been used to brighten or diminish the shadows. In other words to “fill” the shadows with extra light to reduce the contrast and create a more flattering image.
Eliminate harsh shadows with Fill Flash
Both these images are shot at the same camera exposure settings. Remember, we’re outside and even though it was a cloudy day, we are not using the flash to adjust the exposure. The exposure is set appropriately for ambient daylight.
See how the fill flash brightens the face eliminating unwanted shadows.

We don’t want the fill flash to be too bright or it will expose the face to too much light, making the subject appear “bleached”. I usually set the flash a couple of stops higher than the daylight, reducing the power, especially in close-up portraits. Whereas I would set the flash to the same as the camera for more distant subjects, e.g. a wedding group.
The ideal result is to provide a neutral skin tone.
TIP 1: Have your subjects at 45 degrees to the sun, never shoot with sun directly behind you. The light will be flat and too bright.
Back-light with Sunlight and use fill flash to front-light
Back-lighting (shooting into the sun), when done well, creates some great effects. It has the advantage of highlighting hair (especially blond hair) or bridal veils at a wedding. It’s also great if you have a water fountain in the background. The other advantage is that your subject has their back to the sun and is therefore not squinting.
The downside is the risk of glare, so always use a lens hood. The other challenge is balancing the correct exposure. This problem is created by a sunny background and a subject’s face entirely in shadow. If you expose for the face, the background will be too light and if you expose for the background the face(s) will be too dark. A fill flash can be used to correct this.
The use of back-lit sun and fill flash, combined with a wide aperture (to blur the background) has created a great effect in Img 3.

TIP: for the best back-lit portraits, as in Img 4, ensure you position your subject, so the sun is shining onto the back of their heads and not on their face.

Tip: Remember the smaller the “F” number on the aperture setting, the wider (larger) the aperture opening and smaller the depth of field.
See more on this in the “Aperture” section in Camera Settings.
Brighten your images on cloudy days when the light is dull and flat.
This is when off camera fill flash can work really well. On a dull day the sun is shining through thick cloud, which acts like a giant diffuser making the light very flat and uninteresting.
In Img 5, taken with the background through a window, we see how in dull light, the light on both the subject and background is dull and flat.

In Img 6, however, we see how brightening the shot with fill flash or “portable sunshine” lifts the image and creates more “modelling” in the subjects face.
The key is to move the flash to the side and above the camera, pointing it down at the subject.

Using a second fill flash
If you’re feeling really creative, you can add a second flash with a slave cell, either get someone to hold it or mount it on a light stand. This second light can be at 45 degrees behind, creating an impression of back lit sunshine.

Any questions? I’d love to hear your thoughts


The following comment was originally posted to the same page on my old website, now offline:
1 thought on “When to use Fill Flash”
EMMANUEL10/05/2023 AT 1:14 PM
Your analysis and perspectives are refreshing and enlightening.